Digital Signing with Java
 |
| Digital Signature Source: Wikipedia |
In today's post, we are going to see how easy it is to do digital signing using Java programming language. Java has provided libraries that you can use out of the box to produce digital signature. Let's get started.
A little bit of theory
For those of you who do not know yet about digital signature, this is basically a process that ensures that the content that you sent has not been altered in any way. Digital signature is one of the most important things to do in this digital world. Without it, it will be hard to verify data integrity.
Relationship with Hashing
At this stage, one must have noticed that to check data integrity, you can actually use a hashing algorithm. For example, when you download a file from the internet, they usually provide the hash (be it MD5 or SHA1 or higher) for you to check the integrity of the downloaded file.
Although this is true, digital signing actually provides you with more than just a data integrity. Digital signing has tight integration with PKI (Public Key Infrastructure). In order to perform digital signing, you need to have a pair of keys, called Public Key and Private Key. Given that public-private keypair is owned only by one person, one cannot deny that he/she performed the digital signature (so called non-repudiation).
In practice, digital signing involves TWO (2) concepts of security, named hashing and encryption. Hence, you will later see that the digital signing algorithm indeed is a combination of hashing algorithm and asymmetric key algorithm.
How it works
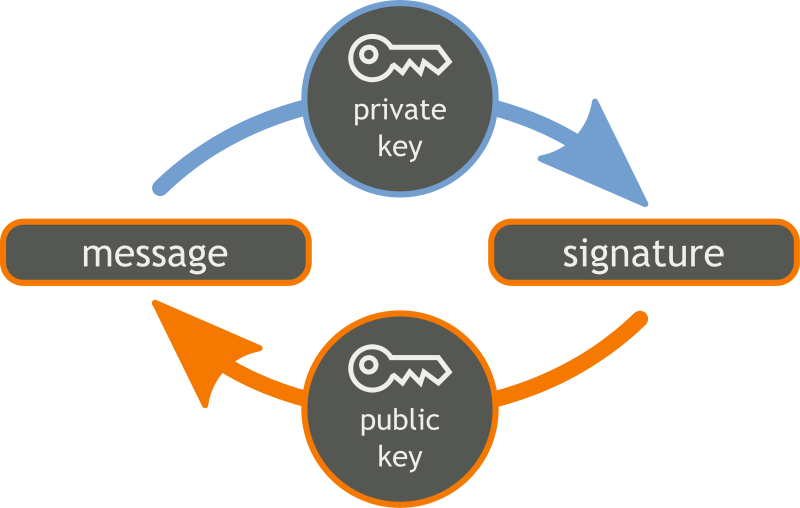
 |
| Digital Signing Concept Source: Wikipedia |
The image above depicts the simple and usual use case of digital signing. Let's say there are TWO (2) people, namely Alice and Bob. Alice wants to say hello to Bob via a message, and Alice wants to ensure that the message is not tampered during the transit to Bob. Alice will perform digital signing using her private key.
Why you would ask? Why not use Alice's public key? To answer this, we need to remember back the concept of non-repudiation briefly mentioned above. Public Key (as the name suggests), can be distributed to anyone in the world, because it's public. Private key though, on the other hand, can only be kept by the key owner. Hence, when Alice performs digital signing using her private key, we can ensure that the message does come from Alice.
Now, once Bob receives the message, Bob has to ensure that the message has not been tampered. Bob verifies the digital signature against the plain message he receives from Alice using Alice's public key. If the verification successful, this proves that the message indeed come from Alice and has not been tampered during transit to Bob.
Java implementation
Keypair generation
We will start our first step of performing digital signing with keypair generation method. This method is used to generate a new keypair that will be used through the entire process of signing and verification. See below.

I have created a new method named generateKeyPair. This method accepts TWO (2) parameters, which is the keypair algorithm and the length (or so called the key size).

As can be seen above, I tried to perform signing to a string "Hello Digital Signing with Java". The keypair is to be generated using RSA-2048 and the signing algorithm will be SHA256withRSA. By now, you should have noticed that the signing algorithm is the combination of the hashing and asymmetric-key algorithm, like what I have mentioned above.
I have created a new method named generateKeyPair. This method accepts TWO (2) parameters, which is the keypair algorithm and the length (or so called the key size).
Generating keypair in Java involves initialising a class named KeyPairGenerator. You just need to provide the name of the algorithm to its getInstance method. It will return the appropriate instance of the KeyPairGenerator. There are some other overloading methods of the getInstance which allow you to provide different provider, however this is out of the scope of this post.
Once you get the instance of the KeyPairGenerator, you need to tell the length of the key to be generated to this generator. This is as simple as calling the initialize method and passing in the key length required.
Once the generator is set, simply call the generateKeyPair method and it will generate the keypair for you. Do take note that the higher the key size, the longer it takes to generate the keypair.
Signature generation
Now that we have the method to generate keypair ready, let's create another method to perform the signing.

The sign method above accepts few parameters:
- The key to be used for signing. As we have discussed above, we need the private key to do digital signing.
- The plain text to be signed. From the above example, this is the string "Hello Bob."
- The signing algorithm. This is the algorithm that will be used to perform the digital signing process.
Just like keypair generation, the procedure to perform digital signing involves several simple steps. First, you need to get an instance of the class Signature by passing in the algorithm to its getInstance method. If the algorithm is recognised and correct, you will get the proper instance of the class Signature to perform the signing.
Once we have the instance ready, we need to tell it which key to use to perform the signing. To do this, we need to call the method initSign of the Signature object and pass in the key that we are going to use to sign.
The next step is to tell the class as well what is the data that we want to sign. To do this, we send in the byte of data to the update method. By now, you should have noticed that the parameter is in byte[] instead of String. This is because you pretty much can sign anything, not only String object. You can perform digital signature on binary files as well.
Once everything is set up, you can simply call the sign method and it will perform the signing and return it to you as a byte array. As you know, byte array is not something that is easily representable to the end user. That's why, we usually encode the signature into more digestible string, such as to Hexadecimal or Base64. In the example above, I encoded the signature to base64 using the Base64 class that is provided by Java as well.
Signature verification
Once we have the digital signature, the process is not complete without performing verification. Here, I created a method to perform digital signature verification.

This method accepts several parameters:
This method accepts several parameters:
- The key to be used for verification. As discussed above, we are going to use public key for verification.
- The plain text that has been signed previously. In the above example, this is the "Hello Bob" string.
- The algorithm for verification. This should be the same algorithm we used for signing.
To perform digital signature verification, we are still using the same class Signature. The difference now is that, instead of calling the initSign method and sending the private key, we should call initVerify method and send the public key.
We then need to tell the class what's the plain text to be checked against. To do this, we call the update method and passing in the plain data as the parameter.
Once everything is ready, we simply just need to call the verify method, passing in the signature data. Notice that I decoded the signature first from base64 string using the built-in Base64 class. This is because during the signing, we encoded the signature using base64. This method returns boolean indicating whether or not the verification is successful. Obviously, true means the verification successful, and false otherwise.
Tying it up together
Now that we have all the methods ready, let's test it and see if everything is working. Take a look at the code below.

As can be seen above, I tried to perform signing to a string "Hello Digital Signing with Java". The keypair is to be generated using RSA-2048 and the signing algorithm will be SHA256withRSA. By now, you should have noticed that the signing algorithm is the combination of the hashing and asymmetric-key algorithm, like what I have mentioned above.
The flow is simple to follow. We generate the keypair first by calling the generateKeyPair and passing in all the required parameters. If key generation is successful, we will then proceed with the signing. Again, if signing is successful, we then proceed with verification.
Let's run the application and see what's the output.
Signature: I6NfpcLSd4jTyx+GMFHKxMpnK03M0N1DoCD5eq8/0yO9qi72isfhBvBjAll0DWbdLXsJdp0Fy4CifEcgrJMmjbbyR0lMg2vQzUuOJdudvLWFN4lJsN2rvIE3bD8pCvpdFio8M4cZlkGqO4MAp59xdSIYNTs9FBmk2e2WAPeSGKiC3AysdAn04Ctn37g1jDyC5RPCzZN/JGxma8TIFaBhW30JWo/inc5FnaqQ/D93L5N845RDFv175Lc6josOe6GlJoznmhxK7GyeilwZSg9PVHjTJIhFWmI3mASSRIsMalK8jKXWUZi8GILrMxJEGN5v1svID9RcQkhpW/ktyEf+tQ==
Now verifying...
Result: true
Now, you can see that we have successfully generate the digital signature, which is then printed in base64 encoded format. The verification is as well successful. This proves that the data has not been tampered.
Now, let's see what happen if we change the code to be like below.

Instead of just sending TO_BE_SIGNED to the verify function, I sent TO_BE_SIGNED + "noise" instead. This will change the plain text from "Hello Digital Signing with Java" to "Hello Digital Signing with Javanoise".
Here is the output of the application now.
Signature: MLU+sWv0a8m2LSXzqnmjTQbcy89T3W7fn1n1W+qbxWmqu7eZoh6MSkwEZtZ0Vc9XIKRNjKI7Alm8+mMYYc0oqGk2favaHulUu77cFdSOn0xtJykqS4mFWplpUbZOmSFSop2slIvwpNE6vWxAUFd8T6Dt+041JCThiu5eq1VLmnHdGQB4SG8bOvxea2xH5ajXGX33au4m/Pn6TILmE+5JkRvSdCzwHsfONJ//RqcinHYWlcYOTTp+jqKJZL2FzHPE5EJoTg/8shmqFow0pFuiFXcAbuVaDfQ5U+4RiUyBTzp6TSjiQiNTRfEKKSTuP9A2ayegr5D9v5PNrwlT3U1Qtg==Now verifying...Result: false
You can see above that the verification result now is false. This proves that the data has been tampered.
Conclusion
Digital signing is very important to ensure data integrity and non-repudiation. This can be easily achieved with Java programming language using a few simple steps that we have discussed above. Hope this post helps.
Source code for this post is available on GitHub as well: https://github.com/handracs2007/digitalsigning.
Cheers


Comments
Post a Comment